 Here are five more bears for the Mother Bear Project. I haven't made as many as usual with my busy schedule and all. Like the others, these bears are riding on a cushion of yarn, for the knit & crochet kits for sale and for local Minneapolis bear makers.
Showing posts with label charity. Show all posts
Showing posts with label charity. Show all posts
Tuesday, June 12, 2012
Springtime Bears
Here are five more bears for the Mother Bear Project. I haven't made as many as usual with my busy schedule and all. Like the others, these bears are riding on a cushion of yarn, for the knit & crochet kits for sale and for local Minneapolis bear makers.
Friday, February 17, 2012
Another Happy Mother Bear Box

I haven't been as generous with my knitting lately. School, work, and my internship are keeping me busy. Also, I've been trying to enjoy a little more selfish knitting -- things that I can keep and wear, or to give away to family and close friends.
Still, I try to whip up a bear or two every month, and I donate extra yarn and tools to Mother Bear Project. They organize knitting groups in the Minneapolis area to make more bears. They also use the extra yarn to create their wonderful knit and crochet bear kits for sale, to support the charity.
Saturday, December 17, 2011
Last Mother Bear Box of 2011
 Since discovering the organization this past spring, I've been knitting an average of 6 bears per month. It's a win-win activity. I enjoy making the bears, and I really enjoy seeing the photos of them with their African children recipients when they're posted on motherbearproject.org. A nice friend of mine from high school sponsored this entire shipment, so several of these bears bear his name. Many thanks to him!
Wednesday, May 11, 2011
Crochet Mother Bear With No Seams!
 I modified the original crochet pattern of the Mother Bear Project for seamless construction, and a little neck shaping, too. The "seam" runs up the center of the back.
I kindly donated my seamless pattern modification to the Mother Bear Project. Please go to their website to purchase the Seamless Crochet Pattern. $5 gets you the pattern, a brochure, the wrist tag, and your first bear's airfare. Additional bears should include $3 each. All proceeds go to the distribution of many more bears to the children who love them.
ERRATA & CORRECTIONS:
(In the first batch printed Jan. 2012.)
Feet start with **Ch7**.
Arms start with **Ch6**.
Rnd 2 of arm/body join ends with **...sc2tog, 6 sc. 52 sc**.
Rnd 1 of head starts with **Ch 1. Turn work**.
And I didn't specify whether you're working on the outside or wrong side. First round of each section and each odd numbered round is worked with outside facing. Even rounds are worked with wrong side facing.
Wednesday, April 27, 2011
Mother Bear Tutorial: Seaming While Knitting
 I make the original flat-knitted Mother Bear pattern using a simultaneous seaming-while-knitting method. If you're like me, and would rather knit than seam; you enjoy the look & simplicity of garter stitch and prefer working with two needles, then this seaming-while-knitting method may be for you. The process is more complicated to explain than it is to actually knit, so I've included a photo-heavy tutorial.
Each step's explanation is followed by its respective photo. So, words first, then photo next. You can move your cursor over each photo for an explanation. You can also click on each photo for a larger view.
I've used some standard knitting abbreviations:
CO = cast on
BO = bind off
K = knit
St(s) = stitch(es)
PU = pick up, meaning place st on the needle; not pick up and knit
First, you'll need the original Mother Bear Knit Pattern. Otherwise, this tutorial will make no sense to you.
Knit the Bear all in garter st. (You can work another pattern, but keep at least 2 edge sts in garter, and work your pattern sts in the middle of your garter edges.)
Begin by knitting half the bear as written.
Stop halfway in head section, ending with wrong side row, ready to begin a front side row.
K across one front side row, then stop, don't turn.

With your empty left needle, begin with the 1st garter ridge in bear color at the bear’s neck.
PU one st for each garter ridge (or 1 st for every 2 rows), slipping your needle under the leftmost st on the front side of your work.


With several PU sts on your left needle, ignore them for now.
Just turn your work...

...and K the wrong side row of Bear’s head sts.


Turn your work. With your now empty right needle, starting at the neck, on the right side, PU one st per garter ridge on the front side of your knitting - the SAME number of sts as PU on the other side.


Next, work short rows to join PU sts with Bear's head sts:
Begin with Bear's head sts in the middle, and the same # of PU sts on either side.
(Your # of PU sts will coincide with your # of rows in half your Bear's head. For me, I work 24 rows, and that's 12 ridges for half the head, so I’ll have 12 PU sts on each side of my Bear's 20 head sts.)
For each front side row, K the 1st head st...

...then pass 1 PU st (the 2nd st on your right needle,
over the st you just K, much like BO 1 st.
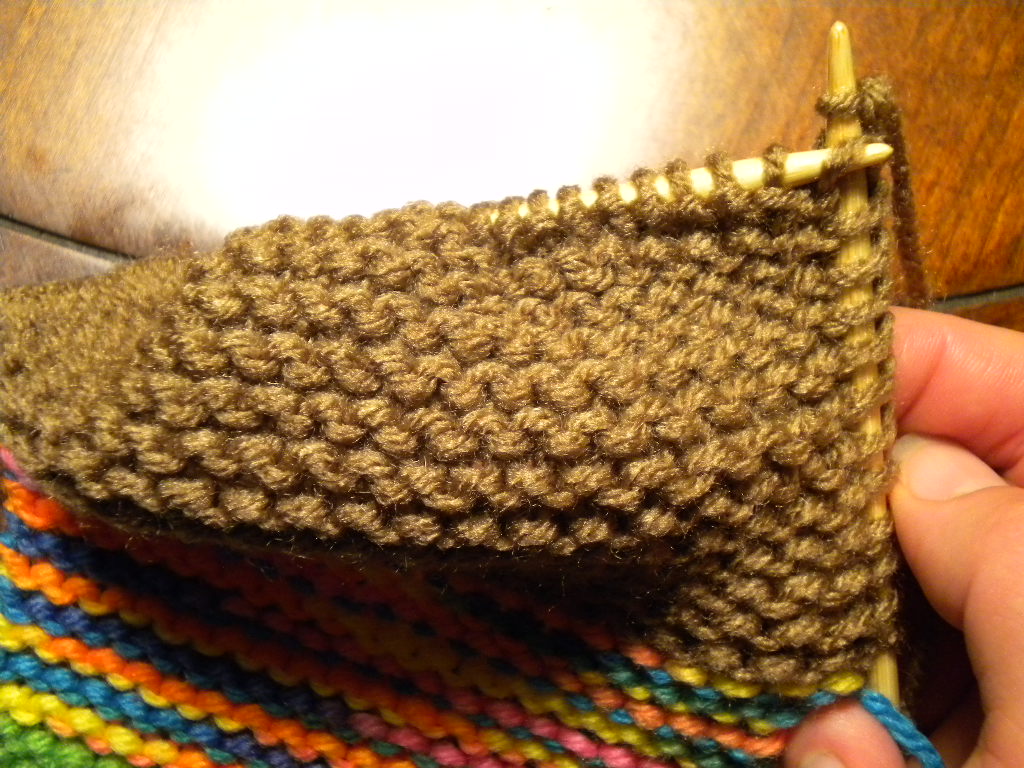
Continue to knit across only the bear’s head sts until the last one...

...and knit that last head st together with the PU st next to it.

Turn work, and K the wrong side row plain, just across the Bear’s head sts only.


Turn work to the front side, and again, repeat the process:
*Start with front side row, K 1 st, pass PU st on its right over, like BO 1 st.
Knit across head sts to last one, k2tog (last head st with PU st on left).
Turn work to wrong side, work plain across head sts only.*
Eventually, your head will look like this:

The head may pop to the wrong side as you're knitting, so just pop it front side out eventually.
Repeat this process, from * to * until all PU sts are worked, and K the last plain wrong side row.

Work the sweater section as written, as you’ll need to keep it open to join the sleeves and for an opening for stuffing.

Stop after the last front side row of the sweater. Don't turn work. With your left needle, pick up the top 8 ridges of the pants, at same side as your full needle tip, on the front side of your knitting, picking up the waist st last.

Turn work. Ignore pants PU sts. K across last wrong side row of sweater.

Turn work. With empty right needle, PU the top 8 ridges on pants, at righthand side, on the front side of your work.

Cut sweater yarn, join pants yarn, then K and join in the same way as for the head:
Start with a front side row. K 1, then pass PU st on its right over, like BO 1 st...

K across pants sts to last one. K2tog (last pants st with PU st on its left).

Turn work to wrong side, work plain across pants sts only.

Repeat as before:
*Start with a front side row, K 1, pass PU st on its right over, like BO 1 st.
Knit across pants sts to last one, k2tog (last pant st with PU st on left).
Turn work to wrong side, work plain across pant sts only.*
Repeat from * to * but stop after the last k2tog with the last PU st...

Stop, don't turn. With your left needle, PU 1 st for each ridge on the front side of your knitting, on the leg opposite the tip your full needle, at the inside of the leg, starting at foot.

It IS possible to PU starting with the feet...

...then continue on with the leg...

...BUT if you join the feet, too, your knitting will eventually get very tight. It helps to initially CO the feet very loosely. Still, you won't be able to spread your needles apart more than 90°. It's easier to join the legs only, then knit the feet as usual, and sew them up later.
Photos show joining the feet, as I do enjoy wrestling with my needles :o)
K the 1st 10 sts of the last wrong side of pants...

...then slip those 10 sts you just K to spare yarn (don't use a stiff holder)...

...then finish working the last 10 sts of that row.

Turn work to front side. PU the same # of garter ridge sts on the righthand side of that same leg with your right needle.

Work the knit-while-seaming method as before:

If joining the feet, change to Bear yarn after the last wrong side row, after working all the leg's PU sts. If knitting the feet plain, just join the bear yarn as usual.

(To finish the foot, you can BO to the CO sts together with a 3-needle BO. Just unpick the CO sts and put them on a spare needle, or if loose enough, just slide each CO loop onto a spare needle. The BO sts on the outside of the foot blends in with the garter ridges.)
To work the 2nd leg, PU 1 st per garter ridge on the remaining leg, on front side of work, on the outside edge of the leg...

...then put the leg sts on holder, onto that same needle, starting with the outside edge, ready to begin a front side row at the crotch.

With your empty needle, PU 1 st per garter ridge on the inside edge of that same leg.

Knit while joining, in the same fashion, and work same as first leg.
Work the sleeves as written.
Turn Bear inside out and weave in ends.
Stuff Bear, then seam sleeves and sides as usual.
(It IS possible to PU the sleeve sts and place them on DPN's to work circularly. If so, first stuff most of the bear, as you'll only have tiny openings remaining at the sides, only enough to stick one finger through. Modify garter st circularly.)
Important points are:
In this tutorial, PU means pick up sts by simply placing the edge sts on your needle. It is NOT the same as picking up and knitting.
Always pick up 1 edge st per garter ridge on the FRONT side of your work, never the wrong side, on the far edge of your knitting. That edge st will either look like a smile or a frown, depending its orientation.
Always begin to PU sts for the next section, BEFORE working the last wrong side row of your current section. Then, work the last wrong side row, and then PU the sts on other edge BEFORE beginning the first front side row of your new section.
In seaming while knitting, rows always start in the middle, at the Bear's body sts. Never work across the PU sts. Only work the PU sts one-at-a-time, at each edge of a front side row.
FRONT side row is the joining row. Wrong side rows are always worked plain.
----------------------------------
I hope this tutorial is clear enough. If you have question, comments, corrections, or complaints please leave a message here. I will receive it in my email. It may take a few days, but I will eventually reply.
Happy Bear Knitting!
Sunday, April 24, 2011
The Third Happy Mother Bear Box
 Another seven Bears are on their way to The Mother Bear Project. From there, they will make their way into the hands of a needy child somewhere in Africa or Haiti. Each bear is handcrafted with love. I've also included some much needed supplies for the organization, specifically, variegated & tan yarn, stuffing, and postage stamps. Bon voyage, little Bears!
Monday, March 28, 2011
Happy Mother Bear Box

Another box of hand-knit & crocheted Bears is on its way to the Mother Bear Project. Yes, I have been a little obsessed with making them. The Bears may be small and simple to stitch, but the happiness that they can bring to an orphaned child is huge.
You may have noticed a donation page added to my blog. I'm not usually one to ask for money for my hobbies. It feels too much like I'm standing on the side of the road hold a sign saying "Yarn addict - please help."
I already have enough yarn to make scores of Bears, so instead, I am asking for donations to send them. Each Bear requires a $3 donation to the organization to cover postal fees to the various foreign countries. A little math shows than this box costs me $35 ($24 for the Bears and $11 for shipping).
I don't want my tight student budget to hinder knitting for charity, so if you'd like to help, any amount donated will be appreciated. I also encourage you to knit and crochet, or whatever you can contribute, to help with charities. It feels great to do something good for someone in need.
Saturday, March 12, 2011
Bon Voyage, Bears!
 I adore the Mother Bear Project. I can't stop making them! I've sent them off, with a little prayer that each one will bring joy to an orphaned child. I've also included some extras for the organization: yarn, stuffing, needles, and hooks. Check their website for info about the contributions they need, and how they are used. And if you can't knit or crochet, you can always sponsor a bear!
Subscribe to:
Posts (Atom)