Showing posts with label techniques. Show all posts

Wednesday, April 27, 2011

Mother Bear Tutorial: Seaming While Knitting

Mother Bear I make the original flat-knitted Mother Bear pattern using a simultaneous seaming-while-knitting method. If you're like me, and would rather knit than seam; you enjoy the look & simplicity of garter stitch and prefer working with two needles, then this seaming-while-knitting method may be for you. The process is more complicated to explain than it is to actually knit, so I've included a photo-heavy tutorial.

Each step's explanation is followed by its respective photo. So, words first, then photo next. You can move your cursor over each photo for an explanation. You can also click on each photo for a larger view.


I've used some standard knitting abbreviations:

CO = cast on
BO = bind off
K = knit
St(s) = stitch(es)
PU = pick up, meaning place st on the needle; not pick up and knit

First, you'll need the original Mother Bear Knit Pattern. Otherwise, this tutorial will make no sense to you.

Knit the Bear all in garter st. (You can work another pattern, but keep at least 2 edge sts in garter, and work your pattern sts in the middle of your garter edges.)

Begin by knitting half the bear as written.

Stop halfway in head section, ending with wrong side row, ready to begin a front side row.

K across one front side row, then stop, don't turn.

After finishing the last front side row of Bear's face, stop, don't turn your Bear around.

With your empty left needle, begin with the 1st garter ridge in bear color at the bear’s neck.

PU one st for each garter ridge (or 1 st for every 2 rows), slipping your needle under the leftmost st on the front side of your work.

Start PU at neck.

PU 1 st per garter ridge.

With several PU sts on your left needle, ignore them for now.

Just turn your work...

Turn your work.

...and K the wrong side row of Bear’s head sts.

Knit the Bear's head sts only.

Knit all the Bear's head sts.

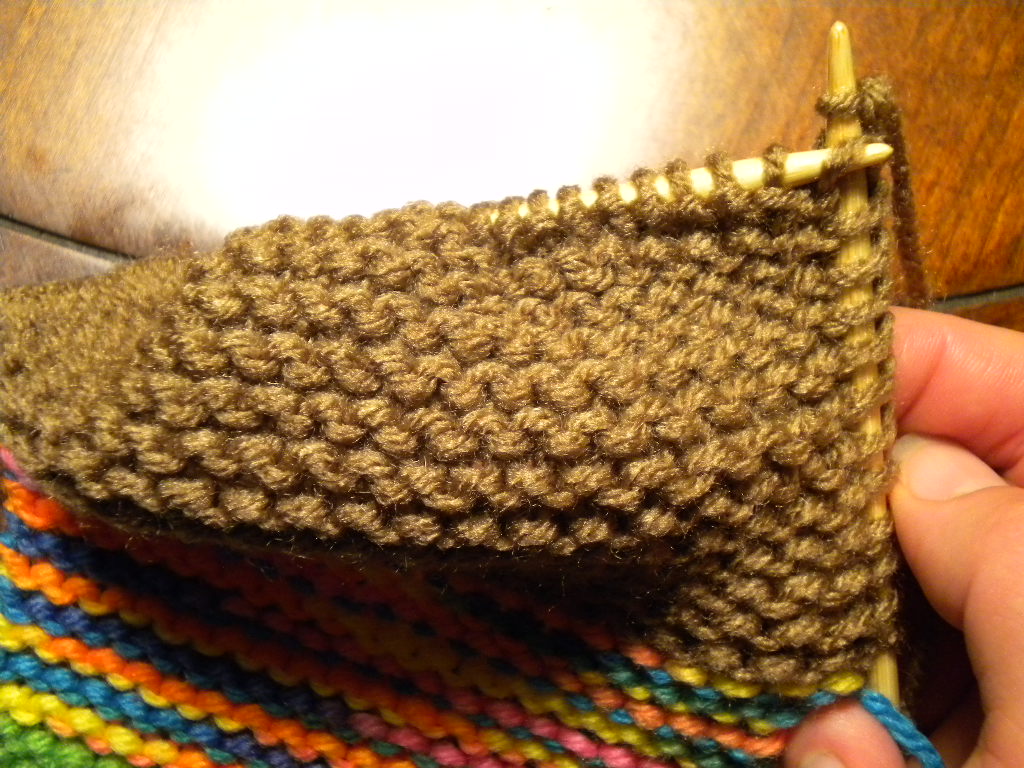
Turn your work. With your now empty right needle, starting at the neck, on the right side, PU one st per garter ridge on the front side of your knitting - the SAME number of sts as PU on the other side.

Start at neck on righthand side, on the front side of your work, PU 1 st per garter ridge.

PU 1 st per garter ridge.

Next, work short rows to join PU sts with Bear's head sts:

Begin with Bear's head sts in the middle, and the same # of PU sts on either side.

(Your # of PU sts will coincide with your # of rows in half your Bear's head. For me, I work 24 rows, and that's 12 ridges for half the head, so I’ll have 12 PU sts on each side of my Bear's 20 head sts.)

For each front side row, K the 1st head st...

K the 1st head st.

...then pass 1 PU st (the 2nd st on your right needle,
over the st you just K, much like BO 1 st.
Pass st over.

Continue to knit across only the bear’s head sts until the last one...

Stop at last head st of front side row.

...and knit that last head st together with the PU st next to it.

K2tog.

Turn work, and K the wrong side row plain, just across the Bear’s head sts only.

Beginning of wrong side row.

End of wrong side row.

Turn work to the front side, and again, repeat the process:

*Start with front side row, K 1 st, pass PU st on its right over, like BO 1 st.
Knit across head sts to last one, k2tog (last head st with PU st on left).
Turn work to wrong side, work plain across head sts only.*

Eventually, your head will look like this:

After about half the PU sts have been joined.

The head may pop to the wrong side as you're knitting, so just pop it front side out eventually.

Repeat this process, from * to * until all PU sts are worked, and K the last plain wrong side row.

K the last plain wrong side row.

Work the sweater section as written, as you’ll need to keep it open to join the sleeves and for an opening for stuffing.

Cut head yarn. Join sweater yarn. K sweater section as written.

Stop after the last front side row of the sweater. Don't turn work. With your left needle, pick up the top 8 ridges of the pants, at same side as your full needle tip, on the front side of your knitting, picking up the waist st last.

PU the top 8 ridges of the pants.

Turn work. Ignore pants PU sts. K across last wrong side row of sweater.

K across last wrong side row of sweater.

Turn work. With empty right needle, PU the top 8 ridges on pants, at righthand side, on the front side of your work.

PU the top 8 ridges on pants, at righthand side, on the front side of your work.

Cut sweater yarn, join pants yarn, then K and join in the same way as for the head:

Start with a front side row. K 1, then pass PU st on its right over, like BO 1 st...

K 1, then pass PU st on right over, like BO 1 st.

K across pants sts to last one. K2tog (last pants st with PU st on its left).

K2tog (last pants st with PU st on its left).

Turn work to wrong side, work plain across pants sts only.


Repeat as before:

*Start with a front side row, K 1, pass PU st on its right over, like BO 1 st.
Knit across pants sts to last one, k2tog (last pant st with PU st on left).
Turn work to wrong side, work plain across pant sts only.*

Repeat from * to * but stop after the last k2tog with the last PU st...

Stop after working last k2tog with last PU st.

Stop, don't turn. With your left needle, PU 1 st for each ridge on the front side of your knitting, on the leg opposite the tip your full needle, at the inside of the leg, starting at foot.

With your left needle, PU 1 st for each ridge on the front side of your knitting, on the leg opposite the tip your full needle, at the inside of the leg, starting at foot.

It IS possible to PU starting with the feet...

PU starting with the feet.

...then continue on with the leg...

Then continue on with the leg.

...BUT if you join the feet, too, your knitting will eventually get very tight. It helps to initially CO the feet very loosely. Still, you won't be able to spread your needles apart more than 90°. It's easier to join the legs only, then knit the feet as usual, and sew them up later.

Photos show joining the feet, as I do enjoy wrestling with my needles :o)

K the 1st 10 sts of the last wrong side of pants...

K the 1st 10 sts of the last wrong side of pants.

...then slip those 10 sts you just K to spare yarn (don't use a stiff holder)...

Slip those 10 sts you just K to spare yarn.

...then finish working the last 10 sts of that row.

Finish working the last 10 sts of that row.

Turn work to front side. PU the same # of garter ridge sts on the righthand side of that same leg with your right needle.

PU the same # of garter ridge sts on the righthand side of that same leg with your right needle.

Work the knit-while-seaming method as before:

Knit-while-seaming. Your work will be tight at the legs.

If joining the feet, change to Bear yarn after the last wrong side row, after working all the leg's PU sts. If knitting the feet plain, just join the bear yarn as usual.

Change to Bear yarn here.

(To finish the foot, you can BO to the CO sts together with a 3-needle BO. Just unpick the CO sts and put them on a spare needle, or if loose enough, just slide each CO loop onto a spare needle. The BO sts on the outside of the foot blends in with the garter ridges.)

To work the 2nd leg, PU 1 st per garter ridge on the remaining leg, on front side of work, on the outside edge of the leg...

PU 1 st per garter ridge on the remaining leg, on front side of work, on the outside edge of the leg.

...then put the leg sts on holder, onto that same needle, starting with the outside edge, ready to begin a front side row at the crotch.

Put the leg sts on holder, onto that same needle.

With your empty needle, PU 1 st per garter ridge on the inside edge of that same leg.

PU 1 st per garter ridge on the inside edge of that same leg.

Knit while joining, in the same fashion, and work same as first leg.

Work the sleeves as written.

Turn Bear inside out and weave in ends.

Stuff Bear, then seam sleeves and sides as usual.

(It IS possible to PU the sleeve sts and place them on DPN's to work circularly. If so, first stuff most of the bear, as you'll only have tiny openings remaining at the sides, only enough to stick one finger through. Modify garter st circularly.)

Important points are:

In this tutorial, PU means pick up sts by simply placing the edge sts on your needle. It is NOT the same as picking up and knitting.

Always pick up 1 edge st per garter ridge on the FRONT side of your work, never the wrong side, on the far edge of your knitting. That edge st will either look like a smile or a frown, depending its orientation.

Always begin to PU sts for the next section, BEFORE working the last wrong side row of your current section. Then, work the last wrong side row, and then PU the sts on other edge BEFORE beginning the first front side row of your new section.

In seaming while knitting, rows always start in the middle, at the Bear's body sts. Never work across the PU sts. Only work the PU sts one-at-a-time, at each edge of a front side row.

FRONT side row is the joining row. Wrong side rows are always worked plain.

----------------------------------

I hope this tutorial is clear enough. If you have question, comments, corrections, or complaints please leave a message here. I will receive it in my email. It may take a few days, but I will eventually reply.

Happy Bear Knitting!

Wednesday, May 27, 2009

Crochet Coasters


I love simple circles, especially when made with cotton yarn.

One 2.5 oz ball of solid Peach'n Creme will make at least six circles,
approx. 4" (10cm) in diameter.

Use a 4.0mm hook, or whatever size suits your gauge.

(Beg ch3 always counts as a dc st.)

Start with an adjustable ring.

1st Rnd: Ch3, 11dc in ring, ss into beg 3rd ch - 12 sts total.

2nd Rnd: Ch3, 1dc in same 3rd ch as last ss, 2dc in next and each st all around, ss into beg 3rd ch - 24 sts total.

3rd Rnd: Ch3, 1dc in same 3rd ch as last ss, *1dc in next st, 2 dc in next st, rep from * to last st, 1dc in next st, ss into beg 3rd ch - 36 sts total.

4th Rnd: Ch3, 1dc in same 3rd ch as last ss, *1dc in each of next 2 sts, 2 dc in next st, rep from * to last 2 sts, 1dc in each of next 2 sts, ss into beg 3rd ch - 48 sts total.

Fasten off, weave ends, pour an icy beverage, and enjoy your new coasters!


If you want a near-perfect edge, after the last dc, don't ss, instead cut the yarn about 4 inches or so, then pull it all the way through the top of the last dc. Next, thread the yarn on a needle, and run it under & through the top of the beg ch3, then back down into the center of the last dc. Adjust the tension to make it look like the top of a st, then weave in ends.

Tuesday, August 19, 2008

Reworking the Rainbow - Super Stretchy Bind-off (Cast-off) for Socks

Rainbow SocksAbout two years ago, my DD chose the yarn for hand-knit socks and described a pattern to me. I happily embarked on the journey, since the self-striping rainbow yarn was fun. In the end, she couldn’t stand to wear wool, and I was left with the choice of ripping and reclaiming the yarn, or gifting them, because I couldn’t get the cuffs past my ankles.

Instead, I ripped back just past the ribbed cuffs that were worked on size 000 (1.5mm) needles, which made them extremely elastic and perfect for staying on the calves of a 9 year old. I put the stitches onto size 1 (2.25mm) needles and worked 2x2 ribbing. When it came time to bind-off, I stopped to think.

The standard bind-off is too firm, even when worked on larger needles. Sewn bind-offs are better, but the best one is the 1x1 tubular bind-off, which I did not do, and the others have to be done so loosely that they tend to look sloppy, plus sewn bind-offs are very tedious. On my last two pairs of socks, I simply doubled the number of stitches, by adding yarn-overs after every stitch on the last row before binding-off.


Rainbow SocksThis time I tried something different – still very stretchy, but without the YO holes, a bit more decorative, since it's done in purl. You could also work it in knit, in ribbing, or whatever stitch pattern you prefer:

SUPER-STRETCHY BIND-OFF

Purl 1, *yo, BO over the yo, purl 1, BO1, rep from * till the end, then fasten off as usual. Weave in the yarn tail underneath the “V” of the 1st BO stitch, then back though the middle of the “V” of your last BO stitch, to bring the edges together seamlessly. For me, I prefer to BO with a tiny crochet hook, since it’s much easier to pull the yo through the st than to try to leapfrog the st over the yo on tiny needles.

The socks now fit me perfectly, and await patiently for the first nip of cool weather. Then I’ll return to the Kool-Aid sock blank. I’m trying the Upstream master pattern from Cat Bordhi’s New Pathways for Sock Knitters.

Wednesday, May 14, 2008

Seed Stitch Accent Tank Top on a Knitting Machine

Cotton Tank TopI worked the body on my Bond knitting machine, and the borders by hand. In the process, I experimented with working short rows on the machine to make bust darts, and so far, they look good. Afterwards, I noticed a very obvious split stitch halfway down the middle of the front, so I decided the best thing was to drop the stitches down and rework them back up. In the process, I though, "why not work them back up in seed stitch?" It was painstaking, but halfway up the column, I got into the rhythm of it, and then worked three more. I think I'll also add another two columns of seed st on each side, to to balance it a bit more. Now all it needs is a proper neckline and some sleeve borders. Only time will tell....

Another Crochet Oven Mitt

Crochet Oven MittsThis time, I worked the one one the right in the round from the top, much like the format for my mittens-from-the-top pattern.

Since I didn't add extra stitches to account for the seams, the seamless version ended up larger, but still very wearable, even for a man's hands. Pattern will soon follow....

Tuesday, January 02, 2007

Sock in the New Year with a Pattern!

For the first time in decades, my family rang in the new year together. Dad, Mom, Sis, her kid, my man, my kid, and her best bud, all came over to my house. We began the evening dining on black-eyed peas and grilled burgers. Afterwards, we played Chinese checkers and drank champange, except for the kids, who conjured up a talent show. They sang, performed magic tricks, and I entered with a guitar rendition of Auld Lang Syne. Then the party turned into a big slumber party, so nobody would have to share the road with the year's first drunk drivers.

Fishermans Wool SocksThe next day, everyone went their merry ways - to Razorback parties, and back home to take naps. I stayed home and cleaned up, then sat down and knit myself a pair of 100% wool socks. I finished them in only a few hours, and they kept me warm through the night.

This following pattern includes lessons on my favorite techniques for socks knitted from cuff to toe. It begins with the tubular cast-on, on to a slipped rib square heel with twisted picked-up stitches in mirror image, and finally ends in a wedge toe that's grafted closed. The worsted weight yarn makes thick and warm unisex socks. The stitch patterns are a mirror image of each other, but the socks will still look fine in the same pattern if your prefer.

Size
Leg approx 6" long by 8" around, to fit a 9" long foot, but leg and foot length are easily adjusted

Materials
Approx. 200 yds (182m) of Lion Brand Fisherman's Wool for woman's US-7
Sizes 4 (3.5mm) and 6 (4.0mm) set of 5 double point needles
Yarn needle

Gauge
5 sts per inch in St st on larger needles

Stitch Pattern for Sock 1

Rnd 1: *K4 P1*
Rnd 2: *K3 P2*
Rnd 3: *K2 P3*
Rnd 4: *K1 P4*

Stitch Pattern for Sock 2

Rnd 1: K1 *P1 K4* P1 K3
Rnd 2: K1 *P2 K3* P2 K2
Rnd 3: K1 *P3 K2* P3 K1
Rnd 4: *K1 P4*

Tubular cast-on

Though initially it's a challenge to learn, nothing beats the stretchiness and aesthetic of this cast-on for 1x1 ribbing. It looks much neater when worked on a needle 2 or more sizes smaller than with the one you'll work your ribbing.

Allow about 1/2 inch of tail for each CO st. Hold your thumb and forefinger of your left hand in a horizontal V-shape pointing right. Lay the yarn across the V so the tail end is draped over your thumb and the ball end over your forefinger. Hold both strands with remaining fingers in your palm underneath, making a simple triangle, just as you would for starting the continental long-tail cast on without a slip knot. Make a simple twist start: with the needle in your right hand, bring the tip over the top of the strand running between thumb and finger, point it downward, then rotate it upwards towards the thumb until the tip faces left again.

Now you're in the starting position (with the needle tip facing left above both strands forming a diamond shape). Keep your finger securely on the starting loop to prevent it from untwisting. For the next steps, you will only work with the inner strands - the ones running from the needle tip to your finger and thumb.

Step 1: Rotate the needle over then behind the finger strand, then going downward beneath both strands, bring the tip up towards you from underneath the thumb strand, then go over the thumb strand, down in between the two strands and underneath and behind the finger strand, and bring the tip up and over the finger strand, returning to starting position. This is a purl stitch.

Step 2: Rotate the needle over and in front of the thumb strand, go underneath the thumb strand, then come up from between both strands, and go over and behind the finger strand, rotating the tip underneath both strands, and finally bringing it up in front of the thumb strand and back into starting position. This is a knit stitch.

Keep alternating between steps 1 and 2, and keep a firm grip on your yarn the entire time, or everything will quickly unravel. When casting on an odd number of sts this way, end with a normal long-tail CO st. Or when CO and even number this way, make the last stitch a half-hitch purl:

Rotate the tip behind the outer strand of the finger and pull up this strand, creating a loop on your finger, then move the tip down between both inner strands, then rotate the tip underneath then in front of the inner thumb strand, pulling this strand up and then push it away from you through the initial finger loop, then release the loop from your finger and tighten as you would for the standard long tail cast on.

This half-hitch purl is almost a mirror image of the continental long-tail cast-on - you're purling it instead of knitting it. You can use it in place of the long-tail cast on to begin your first row as a front side row, or alternate it with the standard long-tail cast on for ribbing or other stitch patterns.

Once you get the knack, it's truly a fast an easy cast on. As with most things it knitting, it's much easier to execute than to describe with words alone.


THE SOCK

On 1 smaller dpn, cast on 40 sts with the tubular cast on. Distribute 10 stitches each on 4 smaller needles. Join to work circularly, being careful not to twist the cast on.

Cuff

With larger needles, beginning with a knit st, work k1 p1 ribbing for 15 rows, or desired length.

Leg

Work sock stitch pattern for 8 repeats, or until desired length.

Heel flap

K21, turn

Row 1: S1wyif, P20, turn

Row 2: (S1wyib, K1)x10, K1, turn

Repeat these 2 rows 9 times, then work row 1

Heel turn

(S1, K1)x7, S1, SKP, turn

Row 1: S1, P9, P2tog, turn

Row 2: S1, (S1, K1)x4, S1, K2tog, turn

Rep these last 2 rows till all heel sts have been worked, ending with row 1 (11 heel sts rem)

(S1, K1)x5, K1

Gusset

*With smaller needle in left hand (after last heel st worked) pick up both strands of chain edge heel flap st , inserting tip from front to back, so the right leg of chain st is in front. Using a second smaller needle in right hand, insert tip from right to left (through the back loop) and knit, hence twisting the st.* Rep along heel flap. You should have about 10 chain edge sts to pick up this way.

Work across instep sts with larger needle, beg with row 1 of st pattern, making last gusset st the 1st st of instep.

*With smaller needle in left hand, (after last instep st worked) pick up both strands of chain edge heel flap st, inserting tip from back to front, so the right leg of chain st is in back. Using a second smaller needle in right hand, insert tip from left to right and knit, hence twisting the st.* Rep along heel flap. You should have about 10 chain edge sts to pick up this way.

(Since you're working down the flap on one side, then up the flap on the other, picking up the sts differently on each side and twisting them in opposite directions makes them look equal. Functionally they both prevent the tiny holes that often occur when picking up gusset sts. You can work either method on both sides.)

Place marker to note beg of rnd.

Rnd 1: K1 rnd even, working with larger needles, dropping the smaller ones as you go, and work next row of st pattern on instep, .

Rnd 2: (K1, S1)x5, K1 across heel sts, K to 3 sts before instep, K2tog, K1, work instep st pattern, K1, SKP, K to end of rnd.

Rep these last two rnds until 40 sts rem, but stop slipping the heel sts, and just k across them even. Depending on number of sts picked up at heel flaps, you may have to skip a dec on either side of instep to keep the number of sts equal.

Foot

Mark beg of rnd just after instep sts.

K20, work instep pattern.

Rep until foot is approx 2 inches less than desired length from heel turn.

Toe

Rnd 1: K1, SKP, work to last 3 heel sts, K2tog, K2, SKP, work to last 3 sts, K2tog, K1.

Rnd 2: K 1 rnd even

Rep these last 2 rnds until 20 sts rem, ending with rnd 1, then work rnd 1 once more.

Divide sts on 2 needles, 8 heel sts on one, 8 instep sts on the other.

Kitchener stitch

Cut yarn with 18" tail and thread on yarn needle.

Hold sock so that both needles are parallel, one in front, the other in back, with sock hanging below, and yarn tail at right.

Insert needle into first st on front as if to purl, then into first st on back as if to knit, pull tight.

Front needle: Insert into first st as if to knit, drop that st off needle, insert into next st as if to purl.

Back needle: Insert into first st as if to purl, drop that st off needle, insert into next st as if to knit.

Rep these last 2 steps, pulling yarn snuggly but not too tightly, until 2 sts rem. Insert into front needle as if to knit, then into back needle as if to purl, drop both sts off needles, then weave tail into wrong side of sock.

Darn loose ends.

This pattern is for personal use only. Kindly let me know if this pattern contains errors. Last update: Nov. 12, 2007